Physical Address
Islamabad, PK
Physical Address
Islamabad, PK

Hair clipper guard sizes control the approximate hair length left after each clipper pass. Lower numbers create shorter cuts, while higher numbers preserve more hair. A #1 leaves about 1/8 inch and can show more scalp. A #4 leaves 1/2 inch for fuller short cuts. A #8 leaves 1 inch for longer clipper-cut tops.
This guide explains clipper guard numbers, measurements, haircut uses, fades, compatibility, home cutting, and maintenance. It compares 10 numbered guards and one no-guard setting.
- This guide compares 10 numbered guards and one no-guard setting.
- Lower guards create close cuts and fades, while higher guards retain more length.
- Buzz cuts commonly use #1 to #3, while longer tops use #4 to #8.
- Start one guard longer when uncertain because clipper settings and hair characteristics affect the result.
Hair clipper guards are numbered comb attachments that control how much hair remains after cutting. A compatible guard fits over the blade and creates a nominal cutting distance.
Understanding clipper guards starts with the number and its matching length. Lower numbers cut closer, while higher numbers retain more hair.

Clipper guard numbers indicate the approximate hair length left after cutting. They do not show how much hair the clipper removes.
Common systems use similar measurements from #1 through #8. However, included guards and attachment designs differ between clipper models.
Whole-number guards from #1 through #8 commonly increase in 1/8-inch steps. A #2 leaves 1/4 inch. A #4 leaves 1/2 inch. A #8 leaves 1 inch.
Metric labels are rounded. For example, 3/8 inch equals about 9.5 millimeters but is commonly labeled 10 millimeters.
Haircut numbers usually refer to clipper guard numbers in barbershops. A number 2 haircut commonly means a #2 guard. However, number 0 can mean a bare blade or a separate brand-specific attachment. Confirm the meaning before cutting.
This clipper guard length chart compares one no-guard setting and 10 numbered guards. It lists clipper guard lengths in inches, clipper guard lengths in millimeters, and common uses for each guard.
| Cutting Setting | Length in Inches | Approximate Length in Millimeters | Common Use |
| No guard | Blade-dependent | Model-dependent | Close stubble and fade baselines |
| #0.5 | 1/16 inch | 1.5 mm | Skin-fade transitions |
| #1 | 1/8 inch | 3 mm | Short buzz cuts and tight fades |
| #1.5 | 3/16 inch | 4.5 mm | Shadow fades and intermediate blends |
| #2 | 1/4 inch | 6 mm | Classic buzz cuts |
| #3 | 3/8 inch | 10 mm | Longer buzz cuts and crew-cut sides |
| #4 | 1/2 inch | 13 mm | Brush cuts and medium crops |
| #5 | 5/8 inch | 16 mm | Textured tops and longer tapers |
| #6 | 3/4 inch | 19 mm | Side parts and longer trims |
| #7 | 7/8 inch | 22 mm | Full crew cuts and short tops |
| #8 | 1 inch | 25 mm | Longer clipper cuts and top trimming |

These measurements follow Wahl’s standard guide-comb chart for #0.5 and #1 through #8. Wahl’s T-blade guide-comb set lists #1.5 at 3/16 inch.
The clipper guard size chart shows nominal cutting lengths. Blade design, lever position, density, texture, and growth direction can change the visible result.
Guard numbers are labels, not millimeter measurements. An #8 guard leaves about 25 millimeters, not 8 millimeters.
Choose a clipper guard size by matching the haircut, head area, hair density, and desired scalp coverage. Start longer when the final length is uncertain.
This selector matches common haircut goals with practical clipper guard sizes.
| Desired Result | Typical Guard Range | Approximate Length |
| Very close stubble | No guard to #0.5 | Blade-dependent to 1.5 mm |
| Close buzz cut | #1 to #2 | 3 to 6 mm |
| Fuller buzz or short crop | #3 to #4 | 10 to 13 mm |
| Styleable short top | #5 to #6 | 16 to 19 mm |
| Longer clipper-cut top | #7 to #8 | 22 to 25 mm |
These ranges are starting points. Hair density, texture, and growth direction affect the visible result.

Guards #1 through #4 create common short lengths for the sides and back. A #1 creates strong contrast. A #2 produces a close finish. A #3 or #4 keeps more fullness. Fades may combine #0.5, #1, #1.5, and #2.
Choose #2 or #3 for an even buzz cut and #4 through #8 for longer tops. A #4 can suit a crew cut. A #6 allows light styling. A #8 leaves 1 inch for parts, lift, and texture. Scissors remain common for tops longer than the available guards.
Choose a longer guard when reduced scalp visibility is the main goal. Guards #0.5 and #1 can expose more scalp. A #2 leaves more length. Guards #3 and #4 often provide greater visual coverage.
Hair density, strand thickness, color contrast, and lighting also affect scalp visibility. Men with sparse areas can compare haircuts for thinning hair before choosing a short guard.
Popular clipper cuts use no guard through #8, depending on the desired contrast and top length. Common clipper cut styles include buzz cuts, crew cuts, high-and-tights, and undercuts. For broader style selection, compare these options in our men’s haircut guide.
Wahl’s haircut-number guide places #1 through #3 in buzz-cut ranges and #4 in crew-cut territory.

A buzz cut guard length commonly ranges from #0.5 through #4. A burr cut often uses #0.5 or #1. An all-over #2 or #3 creates a low-maintenance buzz cut with a uniform length all over. A butch cut may use #3 or #4 for a fuller finish.
Compare buzz cut guard lengths before selecting one all-over setting.
A crew cut uses short sides with slightly longer hair on top. Guards #1 through #3 can shape the sides. Guards #4 through #8 or scissors can shape the top. Compare crew cut guard options when choosing the top length.
A high and tight often uses no guard through #2 on the sides. The top remains longer for clear contrast.
A short back-and-sides cut commonly uses #2 through #4 below a longer top. Guards #6 through #8 or scissors preserve the top. An undercut may use #1 through #3 on the sides. The longer top remains separate without a gradual blend.
Fade and taper sequences may use no guard through #4, plus half guards and lever adjustments. The exact sequence depends on placement, density, and top length.
The difference between a taper and a fade explains how much of the sides and back receive the blend.
Low, mid, and high fades use similar guards but place the transition at different heights. A progression may begin with no guard or #0.5. It can then move through #1, #1.5, #2, and #3. A #4 may connect the upper sides to longer hair.
A low fade stays near the ears and nape. A mid fade places the transition around the middle sides. A high fade places it higher.
Compare low, mid, and high fade examples for visual placement.

The taper lever adjusts the blade position between fixed guard lengths. An open lever leaves slightly more hair, while a closed lever creates a closer cut.
Barbers use intermediate lever positions to soften visible lines between guards. For example, the lever can help blend the space between no guard and #0.5 or between #1 and #1.5.
On supported Wahl clippers, full lever movement changes the cutting length by approximately 1/16 inch. Lever range varies by clipper model, blade design, and manufacturer.
Hair type and density affect how short guard lengths appear after cutting. The same guard can create different visible results on fine, thick, straight, curly, or coily hair.
Fine or low-density hair can show more scalp at #0.5, #1, and #2 lengths. Thick or high-density hair can appear fuller at the same settings.
Curly and coily hair can appear shorter because curl contraction affects visible length. Straight hair shows the remaining length more directly.
Hair clipper guards are not universally compatible across brands and models. Blade width, mounting clips, magnets, and attachment shapes can differ.
A guard designed for one Wahl, Andis, Oster, or BaBylissPRO clipper may not fit another model. Loose or incompatible attachments can move during cutting and create uneven lengths.
Match replacement guards with the exact clipper model, blade type, and manufacturer compatibility information.
A clipper guard is a removable attachment, while a blade is the cutting component beneath it. The guard controls the approximate distance between the blade and scalp. Guard numbers and blade numbers use separate systems. A #10 guard does not represent the same cutting length as a blade labeled #10.
Confirm whether a number refers to a guide comb, detachable blade, or adjustable-blade setting before cutting.
Ask the barber for exact side and back guards, top length, fade height, and neckline shape. Use a reference photo when guard numbers alone cannot describe the result.
State separate lengths for the sides, back, and top. For example, request #2 on the sides and back with #6 on top. In common systems, whole guards from #1 through #8 increase by 1/8 inch. A #2 leaves 1/4 inch. A #6 leaves 3/4 inch. For a scissor-cut top, request 2 inches or enough length for a side part.
Name the fade placement and shortest length. For example, request a low fade down to #0.5. Choose a tapered, rounded, or squared neckline. Ask the barber to begin with #3 before #2 when the shorter length is uncertain.
Record the final guard numbers, lever position, fade height, and neckline. One formula could be #2 sides, #6 top, low fade, and tapered neckline. Save photos from the front, side, and back for future barber visits.
Use hair clipper guards on clean, dry, detangled hair with slow, overlapping passes. Confirm that the attachment fits securely before cutting. Beginners learning how to cut men’s hair can start with one guard across the entire head. Simple all-over cuts are practical men’s haircuts for beginners because they require less blending.
The same process explains how to cut your own hair with clippers. Start longer, check the result, and reduce the length gradually.
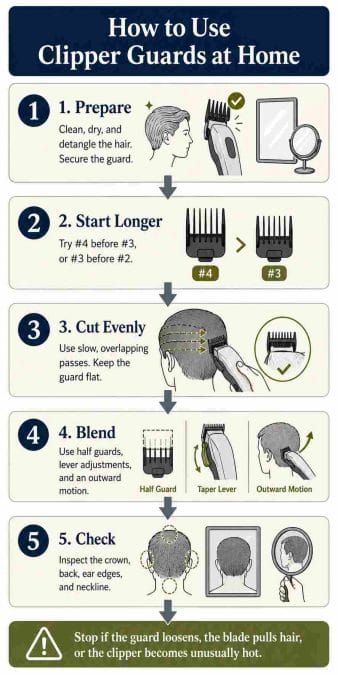
Wash, dry, and comb the hair before cutting. Check the blade, taper lever, lighting, wall mirror, and handheld mirror. Confirm the guard fits securely before switching on the clipper.
Begin one or two guard sizes longer than the planned result. Try #4 before #3, or #3 before #2. Reduce the length in controlled stages.
Cutting against the growth direction usually creates a shorter, more even result. Wahl recommends cutting against the growth direction for consistent guard feeding. Cutting with the grain leaves more length. Keep the guard flat during the main pass.
Blend shorter areas into longer areas with half guards and lever positions. Lift the clipper outward near visible length lines. This motion reduces sharp steps between sections.
Inspect the crown, back, ear edges, and neckline from 2 or 3 angles. Repeat light passes where angled growth leaves uneven hair. Stop if the guard loosens, the blade pulls, or the clipper becomes unusually hot.
Clean guards after each use, disinfect water-safe parts, dry them fully, and inspect every tooth. Maintain the clipper blade separately.
This routine also explains how to clean hair clippers without damaging the motor, housing, or electrical parts.

Switch off the clipper before removing each guard. Brush hair from the teeth, clips, inner surface, blade, and clipper head.
Wash water-safe guards with warm water, mild soap, and a soft brush. Apply a compatible disinfectant using its labeled dilution and contact time. Never immerse a clipper body unless its manufacturer states that it is washable.
Air-dry every washed guard completely before storage. Keep guards in a clean, dry case away from high moisture.
Replace guards with cracked clips, bent teeth, or loose mounts. Damaged guards can shift, scratch the scalp, or create uneven lengths.
Brush the blade before applying the manufacturer’s approved clipper oil. Wahl describes a five-drop oiling pattern using 3 drops across the blade and 1 on each side. Run the clipper to spread the oil, then remove the excess.
Five common mistakes include starting too short, ignoring the lever, rushing, using faulty guards, and cutting tangled hair.
Starting too short can expose more scalp than planned. Try #4 before #3, then reduce the length one guard size at a time.
Ignoring the lever or skipping sizes can leave visible blend lines. Avoid jumping directly from #4 to #1. Blend through intermediate lengths, such as #3, #2, and #1.5, when required.
Heavy pressure and fast passes can create missed hairs, harsh lines, and uneven patches. Use light pressure with slow, overlapping strokes.
Incompatible, loose, cracked, or bent guards can shift during cutting. Check the teeth, clips, mounting fit, and trapped hair before starting.
Wet, tangled, or product-coated hair can feed unevenly through the guard. Dry and detangle the hair before standard guard cutting.
Clipper guard numbers indicate the approximate hair length left after cutting. Standard #1 through #8 guards increase in 1/8-inch steps. Higher numbers leave longer hair.
A #3 guard leaves approximately 10 millimeters of hair. Its exact length is 3/8 inch, or 9.5 millimeters. Manufacturers commonly round this measurement to 10 millimeters.
A #5 guard leaves approximately 16 millimeters of hair. Its exact length is 5/8 inch, or 15.9 millimeters.
A #4 guard leaves longer hair than a #3 guard. A #3 leaves 3/8 inch. A #4 leaves 1/2 inch.
A #4 haircut is shorter than a #5 haircut. A #4 leaves 1/2 inch, while a #5 leaves 5/8 inch.
A #3 guard creates a longer buzz cut and leaves about 3/8 inch. Its extra length can reduce scalp visibility compared with #1 and #2 guards.
An #8 guard leaves 1 inch, not 8 millimeters. One inch equals 25.4 millimeters. Guard numbers do not represent millimeter measurements.
#10 and #12 clipper guards are available for compatible clipper models. Wahl lists the #10 at 1.25 inches and the #12 at 1.5 inches. Compatibility varies by clipper and attachment system.
A #8 is the longest guard in many standard clipper sets and leaves 1 inch. Wahl also offers compatible #10 and #12 extended guards.
Hair clipper guards are not universally compatible. Blade width, mounting clips, magnets, and attachment shapes vary between Wahl, Andis, Oster, and BaBylissPRO systems. Match replacement guards with the exact clipper model or blade type.
In conclusion, hair clipper guard sizes determine the approximate hair length left after cutting. Lower settings create close buzz cuts and fade transitions, while higher guards preserve more length for fuller sides and longer tops. The correct guard depends on the haircut, head area, scalp coverage, clipper model, lever position, hair density, and texture. Starting one guard longer reduces the risk of cutting too short. Clean each guard after use and maintain the blade separately for consistent results.
Use the guard chart to select a starting length, then save the final guard combination for your next haircut.


